
GitHub:
The latest release of XMRig 5.9.0 comes with support for the new RandomKEVA algorithm, which will be used and prepared for the release of Kevacoin (KEVA), since the relatively new crypto project currently uses CryptoNoght R as a proof-of-work algorithm. The new version of XMRig also continues to fix various issues, as well as improvements, such as improved support for AstroBWT, which has also recently been announced in mining software.
XMRig – it is a high-performance miner for the Monero cryptocurrency (XMR) on the GPU and CPU with support for both Linux and Windows. It was originally based on cpuminer-multi, with a large number of various modifications and improvements, as well as the removal of a large amount of legacy code. Starting with version 1.0.0. – completely rewritten from scratch in C ++
Key features of XMRig:
- High performance
- Windows Support
- Small executable file with no dependencies
- Support for both 32-bit and 64-bit processors
- Spare pool support (in case primary becomes unavailable)
- Setting options for the miner via the command line
- Support for the CryptoNight algorithm, as well as CryptoNight-Lite – for mining AEON cryptocurrency
- Automatic configuration of settings at miner startup
- Nicehash Support
- Open source
Full list of available versions XMRig: https://crazy-mining.org/tags/xmrig/
What’s new in 5.9.0?
- Added new RandomKEVA algorithm for upcoming Kevacoin fork, as
"algo": "rx/keva"or"coin": "keva". - Fixed invalid AstroBWT hashes after algorithm switching.
- Fixed build without HTTP support.
- Added command line option
--astrobwt-max-size.
Notes
- For NVIDIA CUDA mining support, use version with
cuda10_1suffix or any regular version with .
Configure and Run XMRig
To get coins, we need to create or edit a finished batch file for the coin you need. These are the basic settings that are enough for mining. Secondary settings will be considered later.
- xmrig-amd this key will indicate which program will be launched. Leave as is. For Nvidia, specify xmrig-nvidia
- -a cryptonight specify the algorithm. For Monero, leave this one. For coins on the cryptonight-lite algorithm, specify it
- -o xmr-eu.dwarfpool.com – specify the address of your pool. In this example, we have dwarfpool, because at the time of writing, he received the largest number of positive reviews…
- 8050 after the pool address through a colon, indicate the port of the pool. dwarfpool has 8050
- -u “4ALcw***NroSAZ” after the key -u we indicate the address of your digital wallet “.5c01d3d *** ba44f3e8” after the address through the point we indicate Payment ID. Some coins do not have it
- –donate-level=1 set up the commission of the miner. By default, it is 5%. level = 1 means 1%
- .rig1 – put a dot and indicate the name of the farm. You can specify any. This is only necessary for tracking statistics on the pool. You will see exactly that name
- pause – specify the pause argument so that in case of any error the program does not close, but displays the code and description of the error that has occurred…
It is important to add the “pause” key at the very bottom of the batch file, so that in the event of a program error or incorrect .bat file syntax, the program would not immediately close, but would display an error code and description on the screen
On this, the basic configuration of the miner can be completed and the program launched. But for completeness, we will consider all the keys of the program in the “Advanced Settings” section.
An example of a batch file for processors:
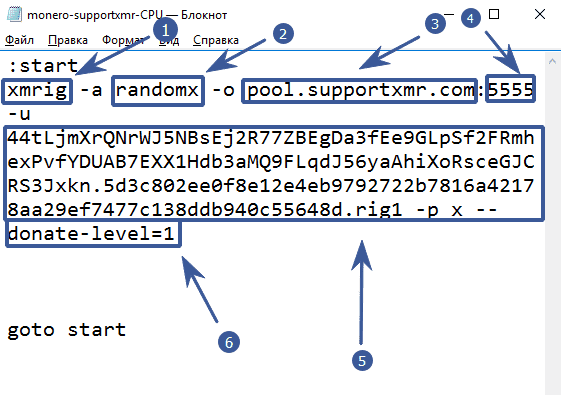
:start
xmrig -a randomx -o pool.supportxmr.com:5555 -u 44tLjmXrQNrWJ5NBsEj2R77ZBEgDa3fEe9GLpSf2FRmhexPvfYDUAB7EXX1Hdb3aMQ9FLqdJ56yaAhiXoRsceGJCRS3Jxkn.5d3c802ee0f8e12e4eb9792722b7816a42178aa29ef7477c138ddb940c55648d.rig1 -p x --donate-level=1
goto start
Example batch file for AMD:
:start
xmrig -a randomx -o pool.supportxmr.com:5555 -u 44tLjmXrQNrWJ5NBsEj2R77ZBEgDa3fEe9GLpSf2FRmhexPvfYDUAB7EXX1Hdb3aMQ9FLqdJ56yaAhiXoRsceGJCRS3Jxkn.5d3c802ee0f8e12e4eb9792722b7816a42178aa29ef7477c138ddb940c55648d.rig1 -p x --donate-level=1 --opencl
goto start
An example of a batch file for Nvidia:
:start
xmrig -a randomx -o pool.supportxmr.com:5555 -u 44tLjmXrQNrWJ5NBsEj2R77ZBEgDa3fEe9GLpSf2FRmhexPvfYDUAB7EXX1Hdb3aMQ9FLqdJ56yaAhiXoRsceGJCRS3Jxkn.5d3c802ee0f8e12e4eb9792722b7816a42178aa29ef7477c138ddb940c55648d.rig1 -p x --donate-level=1 --cuda
goto start
Command line options
Network:
  -o, --url=URL                 URL of mining server
  -a, --algo=ALGO               mining algorithm https://xmrig.com/docs/algorithms
      --coin=COIN               specify coin instead of algorithm
  -u, --user=USERNAME           username for mining server
  -p, --pass=PASSWORD           password for mining server
  -O, --userpass=U:P            username:password pair for mining server
  -k, --keepalive               send keepalived packet for prevent timeout (needs pool support)
      --nicehash                enable nicehash.com support
      --rig-id=ID               rig identifier for pool-side statistics (needs pool support)
      --tls                     enable SSL/TLS support (needs pool support)
      --tls-fingerprint=HEX     pool TLS certificate fingerprint for strict certificate pinning
      --daemon                  use daemon RPC instead of pool for solo mining
      --daemon-poll-interval=N  daemon poll interval in milliseconds (default: 1000)
  -r, --retries=N               number of times to retry before switch to backup server (default: 5)
  -R, --retry-pause=N           time to pause between retries (default: 5)
      --user-agent              set custom user-agent string for pool
      --donate-level=N          donate level, default 5%% (5 minutes in 100 minutes)
      --donate-over-proxy=N     control donate over xmrig-proxy feature

CPU backend:
      --no-cpu                  disable CPU mining backend
  -t, --threads=N               number of CPU threads
  -v, --av=N                    algorithm variation, 0 auto select
      --cpu-affinity            set process affinity to CPU core(s), mask 0x3 for cores 0 and 1
      --cpu-priority            set process priority (0 idle, 2 normal to 5 highest)
      --cpu-max-threads-hint=N  maximum CPU threads count (in percentage) hint for autoconfig
      --cpu-memory-pool=N       number of 2 MB pages for persistent memory pool, -1 (auto), 0 (disable)
      --no-huge-pages           disable huge pages support
      --asm=ASM                 ASM optimizations, possible values: auto, none, intel, ryzen, bulldozer
      --randomx-init=N          threads count to initialize RandomX dataset
      --randomx-no-numa         disable NUMA support for RandomX

API:
      --api-worker-id=ID        custom worker-id for API
      --api-id=ID               custom instance ID for API
      --http-host=HOST          bind host for HTTP API (default: 127.0.0.1)
      --http-port=N             bind port for HTTP API
      --http-access-token=T     access token for HTTP API
      --http-no-restricted      enable full remote access to HTTP API (only if access token set)

OpenCL backend:
      --opencl                  enable OpenCL mining backend
      --opencl-devices=N        comma separated list of OpenCL devices to use
      --opencl-platform=N       OpenCL platform index or name
      --opencl-loader=PATH      path to OpenCL-ICD-Loader (OpenCL.dll or libOpenCL.so)
      --opencl-no-cache         disable OpenCL cache
      --print-platforms         print available OpenCL platforms and exit

CUDA backend:
      --cuda                    enable CUDA mining backend
      --cuda-loader=PATH        path to CUDA plugin (xmrig-cuda.dll or libxmrig-cuda.so)
      --cuda-devices=N          comma separated list of CUDA devices to use
      --cuda-bfactor-hint=N     bfactor hint for autoconfig (0-12)
      --cuda-bsleep-hint=N      bsleep hint for autoconfig
      --no-nvml                 disable NVML (NVIDIA Management Library) support

Logging:
  -S, --syslog                  use system log for output messages
  -l, --log-file=FILE           log all output to a file
      --print-time=N            print hashrate report every N seconds
      --health-print-time=N     print health report every N seconds
      --no-color                disable colored output

Misc:
  -c, --config=FILE             load a JSON-format configuration file
  -B, --background              run the miner in the background
  -V, --version                 output version information and exit
  -h, --help                    display this help and exit
      --dry-run                 test configuration and exit
      --export-topology         export hwloc topology to a XML file and exit
Recommended Related Articles:
- GMiner 2.00: AMD / Nvidia GPUs miner for Windows
- GMiner 1.99: AMD / Nvidia GPUs miner for Windows
- lolMiner 0.9.8 Equihash & Cuckatoo Nvidia AMD miner for Windows & Linux
- miniZ 1.5t Nvidia CUDA GPU miner for Equihash (Windows/Linux)
- Z-Enemy v2.4 (Zealot/Enemy) NVIDIA GPU miner for Windows & Linux
Read more:
 XMRig v5.5.0 (NoDevFee): RandomX, CryptoNight and Argon2 CPU/GPU miner
  XMRig v5.5.0/5.4.0 (RandomX, CryptoNight and Argon2 CPU/GPU miner) XMRig v5.5.1: RandomX, CryptoNight and Argon2 CPU/GPU miner XMRig 5.3.0: Download and Configure CPU/GPU, OpenCL, CUDA miner
  XMRig v5.2.0 (RandomX, CryptoNight, Argon2) – Download and Configure
  XMRig 5.6.0: RandomX, CryptoNight and Argon2 CPU/GPU miner Monero
  XMRig v6.2.0-beta: RandomX, CryptoNight, AstroBWT and Argon2 CPU/GPU miner
  Download XMRig 2.14.6 – Monero AMD (OpenCL) miner XMRig v5.11.2: RandomX, CryptoNight, AstroBWT and Argon2 CPU/GPU miner
  XMRig 5.10.0: Download Miner AstroBWT for AMD GPUs XMRig v5.1.1 (RandomX, CryptoNight, Argon2) – Download and Configure for Windows