Claymore’s Dual Miner v14.6: download and configure for AMD+NVIDIA
Claymore Dual v14.6 (AMD NVIDIA GPU Miner) is a new update to the popular Ethereum dual miner for AMD and Nvidia GPUs.
Changelog v14.6
- Now the
-rxboostoption works on old AMD video cards, I advise you to apply the-rxboost1 option to them, to increase the mining speed - The
-rxboostoption also supports all AMD drivers - The
-strapoption now supports the blockchain version of AMD drivers - Fixed issue with “expired” balls
- New option
"-minspeedtime" - Added statistics on the time the ball was located (average, minimum, maximum), press “s” during mining to see it
- Updated Remote Manager, there is more detailed information on the accepted balls
- Code optimization
Claymore’s Dual setup
Step 1: Download the Miner
Unzip the Claymore Dual archive to any location on your computer. In the folder containing the miner, you must create a file with the extension .bat. You can do this in any text editor (e.g. Notepad). When you save a file, it is important to select “All Files” as the file type, not “txt”. Otherwise, you will have a .bat.txt file at the end of the file name, and the miner will not be able to open this file. Your .bat file (say, it is called test1.bat) should contain the following text (step 2):
Attention! For security reasons, Windows may prevent you from opening the bat file. In this case, you must allow it to open in a popup window.
Step 2: View the batch file to launch Claymore Dual Miner
setx GPU_FORCE_64BIT_PTR 0 setx GPU_MAX_HEAP_SIZE 100 setx GPU_USE_SYNC_OBJECTS 1 setx GPU_MAX_ALLOC_PERCENT 100 setx GPU_SINGLE_ALLOC_PERCENT 100 EthDcrMiner64.exe -epool eu1.ethermine.org:4444 -работник YOUR_RIG_NAME -ewal YOUR_WALLET ADDRESS -epsw x
Step 3: configure the miner with your settings
WALLET_ADDRESS – enter your Ethereum wallet address (exactly so, Claymore Miner knows where to place your ether)RIG_NAME – you can choose any name (for example, test), but do not exaggerate: it should be no more than 32 characters, contain only letters and numbers (without special characters, such as $% »*; @).
Step 4: Start Mining
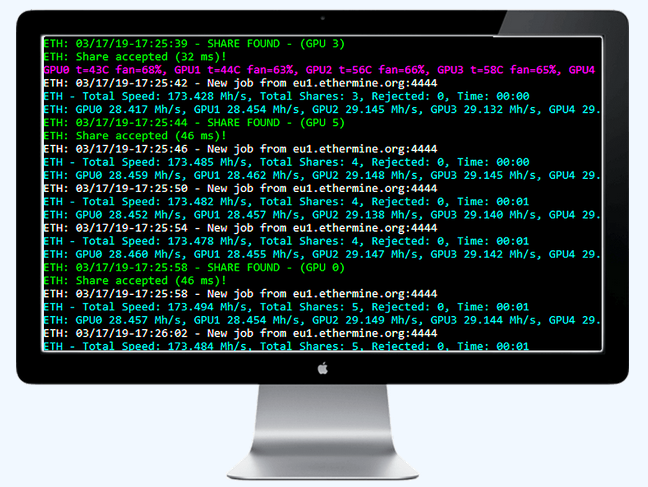
Double click file .вat, чto start the miner. Miner starts up, runs commands setx to set these environment variables, initializes each of your GPUs, creates a DAG file on each of your GPUs and starts hashing. Let it run for about 20 seconds and then press “s” to display your hash rate. If you have completed the steps above, you should see this screen.

Full list of available versions:
Recommended Related Articles:
- Download T-Rex 0.12.0 NVIDIA GPU Miner – Maxwell and newer (Opens in a new browser tab)
- ATIFlash / ATI WinFlash 2.9.3 (BIOS flashing) download (Opens in a new browser tab)
- T-Rex 0.12.1 (Nvidia Miner with improved MTP performance) (Opens in a new browser tab)
- CryptoDredge v0.21.0 (NVIDIA GPU Miner) [Download] (Opens in a new browser tab)
- PhoenixMiner 4.5c – AMD + NVIDIA GPUs Miner (Download) (Opens in a new browser tab)
Read more:
 Claymore’s Dual v14.7 Supercharged Edition AMD+NVIDIA GPU Miner
  Claymore’s Dual Miner CryptoNote: download and configure for Windows
  Claymore Dual v15.0: Download Ethereum GPU Miner for Win/Linux
  XMR-Stak v2.5.1 cryptonight V8 download and configure
  T-Rex 0.14.6 NVIDIA GPU miner – Download for Windows
  nanominer 1.5.1 (Nvidia & AMD miner) – Download and Configure for Windows
  Bminer 15.7.4 (Nvidia & AMD GPU miner) Download and Configure
  T-Rex Miner v0.12.1 (Nvidia): Download with improved MTP performance.
  T-Rex Miner 0.13.0 (Nvidia GPU) Download for Windows 32/64
  PhoenixMiner 4.5c – AMD + NVIDIA GPUs Miner (Download for Windows)
  GMiner v1.88 (AMD and NVIDIA miner) – Download and Configure for Windows 7/10
  PhoenixMiner 4.2a – AMD + NVIDIA GPUs Miner (Download)


Post Comment