
PhoenixMiner 4.5c – AMD + NVIDIA GPU Miner – One of the fastest Ethereum / Ethash cryptocurrency miners with the lowest dev-fee of 0.65%. Phoenix miner is open source software (available under the X11 license). In addition to connecting via RPC and RPC, this miner will connect through the MultiMiner protocol (MMP), which is used by the MultiMiner server.
GitHub:
Changelog v4.5c:
- Added support for the latest AMD drivers for Windows 19.7.3
- Fixed problem with ProgPOW BCI mining on Nvidia RTX20x0 and GTX16x0 cards
Setting up PhoenixMiner
Step 1: Preparation
- Download PhoenixMiner.
- After the download is complete, unzip the archive.
- Next, you must create or edit a file with the extension “.bat”. (You can do this in any text editor).
When you save a file, it is important to select “All Files” as the file type, not “.txt”. Otherwise, you will have at the end of the file name – “.bat.txt”. Because of what, the miner will not be able to open this file.
Attention! For security reasons, Windows may prevent you from opening the “.bat” file. In this case, you must allow it to open in a popup window.
Your “.bat” file (for example 1_Ehereum.bat) should contain the following set of parameters:
setx GPU_FORCE_64BIT_PTR 0setx GPU_MAX_HEAP_SIZE 100setx GPU_USE_SYNC_OBJECTS 1setx GPU_MAX_ALLOC_PERCENT 100setx GPU_SINGLE_ALLOC_PERCENT 100PhoenixMiner.exe -epool eth-eu2.nanopool.org:9999 -worker YOUR_RIG_NAME -wal YOUR_WALLET ADDRESS -pass x
Step 2: miner setup
WALLET_ADDRESS – enter your Ethereum wallet address (this is how PhoenixMiner knows where to make an ETH deposit)
RIG_NAME – you can choose any name (for example, test), but do not exaggerate: it should be no more than 32 characters, contain only letters and numbers (without special characters :! # $% “*; @, etc.).
Step 3: Start Mining
Double-click the “.bat” file to start the miner. The miner will start, run the setx commands to set these environment variables, initialize each of your GPUs, create a DAG file on each of your GPUs and start hashing. Let it run for about 20 seconds and then press “s” to display your hash rate. If you have completed the steps above, you should see this screen.

Setting up a batch file for Ethereum
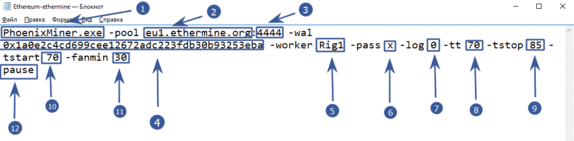
PhoenixMiner.exe– this key indicates which program will be launched. Leave as is-pool eu1.ethermine.org– pool server. Change to another pool or leave ethermine:4444pool port. It is indicated after the colon-wal– this is the address of your digital wallet-worker Rig1– This is the name of your farm worker. Used for easy tracking of statistics on the pool. You can specify any-pass x– password on the pool. Almost never used on pools. X means no password-log 0– responsible for maintaining the miner’s event log. 0 – means do not keep a journal. If you set -log 1, then a log will be kept without showing debug messages on the screen, if -log 2 will record a log and display debug messages on the screen-tt 70– setting the target temperature for controlling the fan (special values: 0 – No control on all cards, 1-4-only monitoring on all cards with an interval of 30-120 seconds, negative values – fixed fan speed (in%)-tstop 85-means that the video card will be suspended when it reaches 85 °-tstart 70– means that the card will start again when its temperature drops to 70 °-fanmin 30– minimum rotation speed of the video card fans. It is recommended to set at least 30 in case MSI Afterburner or other software does not start the equation with fanspause– means that if you configure something incorrectly, the miner will not close immediately, but will display an error code
Setting up a batch file for dual mining Ethereum (Ethereum + Blake2s)
Starting with version 4.0 PhoenixMiner you can get two coins at the same time. This is ideal for those who have cheap electricity. In dual mode increases the power consumption and heat dissipation of video cards. Currently, only the Blake2s algorithm is supported, for example, the Verge coin runs on this algorithm.
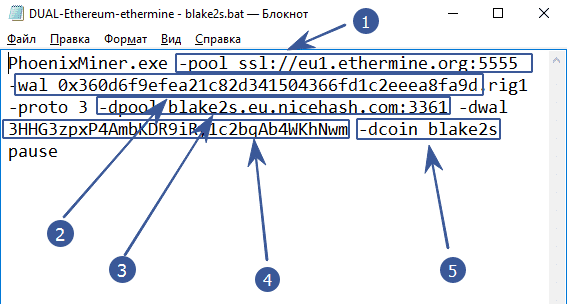
-pool ssl://eu1.ethermine.org:5555– enter the address of the pool of the first coin. The first (main) coin must work on the ethash algorithm. It will not work to make the main another algorithm, as well as the combination of Blake2s + Blake2s-dwal -after the -dwal option, enter the address of the second coin-dpool blake2s.eu.nicehash.com:3361вводим адрес пула второй (для дуал майнинга) монеты. Она обязательно должна работать на алгоритме Blake2s. Не получится комбинировать в дуале Ethash+Ethash (например Ethereum и Ethereum Classic)- -dwal – after the option -dwal enter the address of the second coin
dcoin blake2s– the option means that you will get a second coin on the blake2s algorithm. Currently, only this dual algorithm is supported.
This is where the differences end. For completeness, you can specify additional options as in the example with Ethereum.
We recommend that you specify the parameters:
-tt 75 -tstop 85 -tstart 70 -fanmin 30 -fret 2 -rate 1
in order to save video cards and protect them from overheating and any unforeseen circumstances in case of failure to start the cooler control.
Launch PhoenixMiner
At the first launch, the program will tell us the following information:
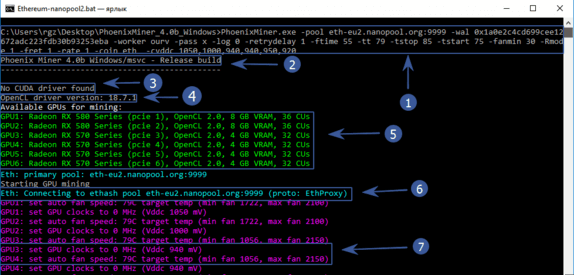
- In the top line there will be everything that we specified in a body shirt
- Program version
- No CUDA driver found – Nvidia driver not found. Because we have AMD, then you should not be scared of this inscription
- Version of your graphics driver
- All available mining devices
- The program starts connecting to the pool
- Overclocking is set to 0 (we overclocked via afterburener), the core voltage is 940 mV (read about lowering energy consumption below), video card fans will try to keep the temperature at 79 °.
After waiting a little longer, we finally see the hash of the video cards and other data:
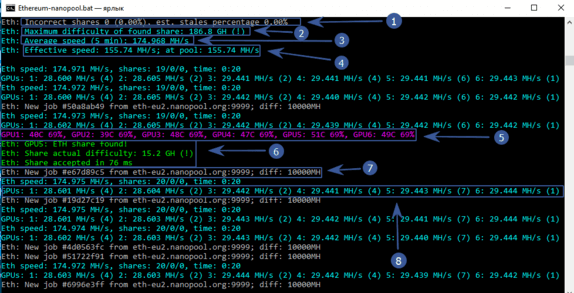
- An incorrectly resolved ball is 0, (0%), an obsolete ball is also 0%. Very good!
- The maximum complexity of the balls found is 186.8 GH
- The average mining speed in 5 minutes is 174 Mh / s
- Effective speed – 155.74 Mh / s. Why is she less? Because we just started the program and the time of the first start, creation of the DAG file, etc. is taken into account. If you wait a while, then this speed will become completely the same with an average speed of 174 Mh / s
- The temperature of each video card and the fan speed in percent. The color scheme can be changed. See below
- Video card number 5 found the ball. I must say that the miners are paid exactly for the found balls.
- Pool sent a new job and indicated complexity
- Hashrate of each video card separately
We examined the basic settings that will already allow you to start mining. The first launch is recommended to be done with minimal or no overclocking of video cards and test PhoenixMiner for stability.
Other versions miner:
Full list of available versions:
- PhoenixMiner 4.8c – improved work and added team
- PhoenixMiner 4.7c (AMD & NVIDIA GPU Miner)
- PhoenixMiner 4.5c – AMD+NVIDIA GPUs Miner
- PhoenixMiner 4.2a -AMD+NVIDIA GPUs Miner
- Phoenix Miner is a miner for the Ethash algorithm.
- New Miner PhoenixMiner 2.9b Released
Recommended Related Articles:
- CryptoDredge v0.21.0 (NVIDIA GPU Miner)
- T-Rex 0.11.0 (Nvidia GPU Miner)
- T-Rex 0.10.2 – MTP and Tesla p100 support
- XMR-Stak 2.10.7 (AMD & Nvidia GPU Miner)
- [NoDevFee] How to disable DevFee (commission) in the miner
Read more:
 PhoenixMiner 4.2a – Download AMD + NVIDIA GPUs Miner
  PhoenixMiner 5.9d (AMD & NVIDIA): Download miner ETH, ETC, Muiscoin, EXP, UBQ
  PhoenixMiner 4.9b: Download AMD Nvidia Miner for Windows/Linux
  PhoenixMiner v5.0b: Nvidia & AMD GPU miner (Download for Windows/Linux) PhoenixMiner (NoDevFee): Download miner for AMD and NVIDIA. Download PhoenixMiner 4.7c (AMD & NVIDIA GPU Ethash Miner)
  PhoenixMiner 5.3b [AMD/NVIDIA]: Download Ethereum/Ethash miner (Win/Linux) PhoenixMiner 2.9b: Download miner AMD NVIDIA for Windows PhoenixMiner 4.9c AMD NVIDIA GPU Ethash miner (Windows/Linux)
  CryptoDredge 0.23.0 Nvidia GPU miner (Download and Configure for Windows)
  T-Rex 0.8.0 (Auto update, Watchdog) Download Nvidia GPU miner
  PhoenixMiner 6.2c: Download from LHR NVIDIA for Windows & Linux