
How to reset the TeamViewer ID: Download TeamViewer ID Reset Software
ID Reset TeamViewer
Attention! The article is for informational purposes only, it is strongly discouraged to repeat the steps, installing pirated software, visiting sites prohibited by the RKN, you are breaking the law, remember this. You are responsible for repeating these steps!
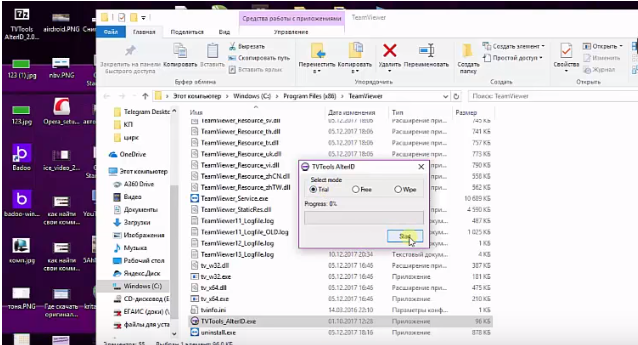
Install the program, run it every time before entering teamviewer, the program will do the rest for you. You can leave your wishes in the comments.
How to reset TeamViewer ID
After installing TeamViewer , the first time you connect to the server, the program receives a unique identifier ( ID ) that identifies your computer and the TeamViewer client on the network (it is the ID that remote clients can connect to you ). When using the free version of TeamViewer and connecting to different clients, from the developer’s point of view, you are using the program for commercial purposes, which is prohibited for the free version. It is highly likely that the time of your connection to remote computers will be limited in the TeamViewer server to a few minutes (no more than 5 minutes), after which the connection is terminated. In this case, in order to remove the restriction, you will have to purchase a license or … reset the current TeamViewer ID so that from the point of view of the TW server, you have a completely new client.
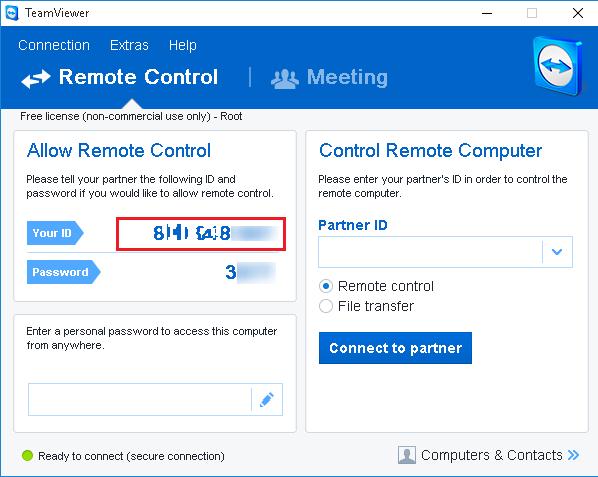
The current TeamViewer ID can be seen on the main screen of the program.
The TeamViewer ID is generated based on the following unique attributes of each computer:
- MAC address of the computer’s network card
- Disk partition identifier (VolumeID)
- Dates of the “Program Files” folder
Thus, in order to change (reset) the ID of your copy of TeamViewer, we need to change all three values.
How to change catalog creation date
You can change the creation date of the directory on the file system using the NirCMD utility. Download the utility, run the command line and change to the directory with the utility. To change the creation date of the Program Files folder to the current time, run the command:
nircmdc.exe setfilefoldertime "C:\Program Files" now now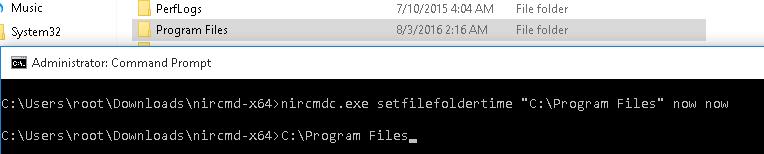
How to change the MAC address of a network card in Windows 10
You can change the MAC of the network card using third-party utilities, but we will perform this operation manually (no need to run third-party tools!).
To get the current MAC address and name of the network card, use the following command:
Ipconfig /all
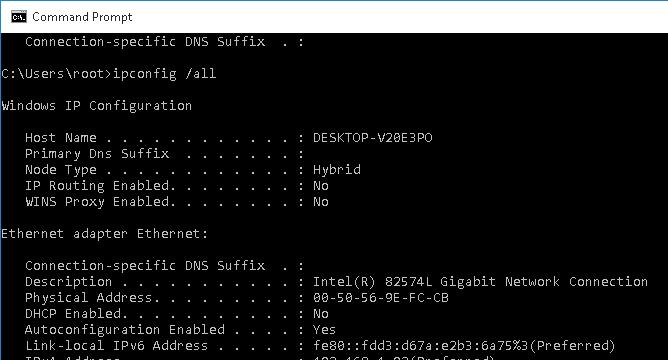
We are interested in two parameters
- Description (название вашей LAN карты) Intel(R) 82547L Gigabit Network Connection
- Physical Address (MAC адрес карты) 00 50 65 E9 FC CB
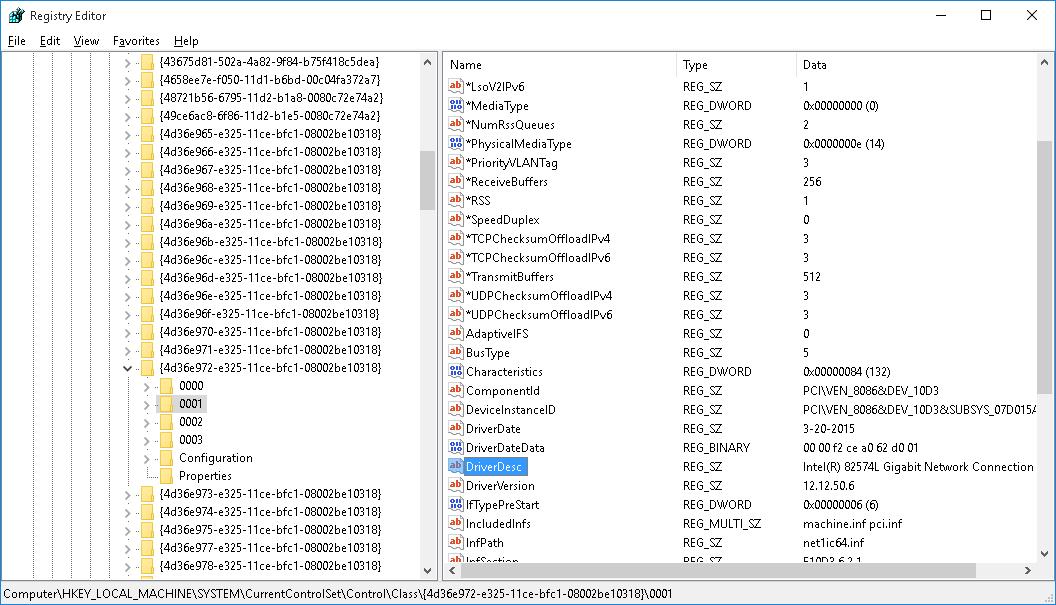
Then open the Registry Editor and go to HKLM \ SYSTEM \ CurrentControlSet \ Control \ Class \ {4d36e972-e325-11ce-bfc1-08002be10318}.
Each network component in this section is described by four numbers, starting with 0000, 0001, and so on. To find the required section, you need to look through all of them one by one and find the section in which the value of the DriverDesc parameter is specified by the name of the network card we defined earlier. In our case, this is Intel (R) 82547L Gigabit Network Connection.
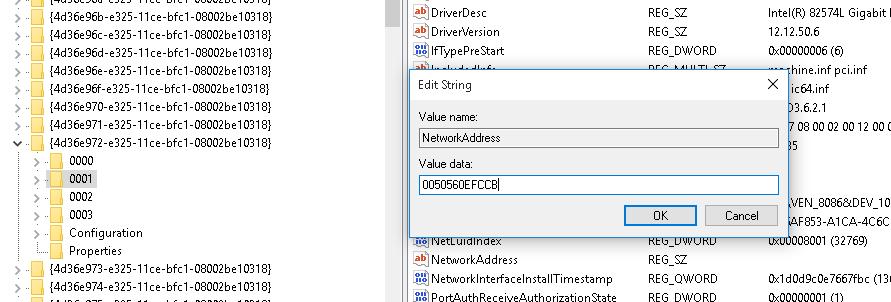
After finding the correct LAN card, create (edit) a key of the REG_SZ type named NetworkAddress . This key determines the hardware (MAC) address of your network card. It will be enough to change any one digit of the current address, for example 00 50 56 E 9 FC CB
Change VolumeID section
After the MAC address of the network card has been changed, it is time to change the VolumeID of the system partition C: \. VolumeID (or Volume Serial Number) is a unique identifier for the volume that is assigned to it during formatting. Note . In some cases TeamViewer is not tied to the system partition, but to the second / third disk partition, or even to an external USB drive / stick. In this case, it is advisable to change the VolumeID for all partitions in the system.
To change the VolumeID we will use the console utility . Download and unpack the VolumeId.zip archive.
Get the current VolumeID of the C: \ drive by opening a command prompt with administrator rights and running the command:
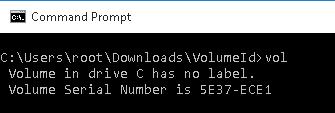
vol
Volume Serial Number is 5E73-E0E1
Change the current values of the volume serial number to a new one
Cd c:\users\admin\Downloads\VolumeIDVolumeid.exe c: 1E37-E011
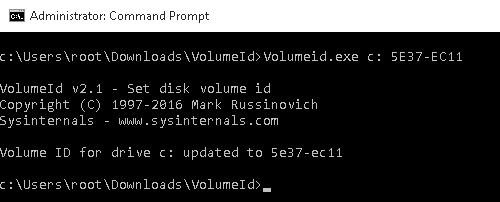
After the volumeid utility changes the volume ID, restart your computer by running the command:
shutdown –f –r –t 0
After the computer boots up, start TeamViewer and your copy of the program will be assigned a new ID.
Read more articles about cryptocurrencies and mining at CRAZY-MINING.ORG
Do you like to read similar articles about cryptocurrencies and mining, do you want to support me as an author or ask questions? Be the first to know the news, subscribe to my telegram channel
Recommended related articles:
- GPU-Z v2.32.0: Download Standard Version & ASUS ROG Themed for Windows
- HawaiiBiosReader 290/290X/295X2/390/390X (Hawaii Bios Editing)
- AWESOME MINER v7.8.5 (CPU & GPU): Download for Windows/Linux/ASICs
- ATIFlash / ATI WinFlash 2.9.3 (BIOS flashing)
- SRBPolaris V3.5 — BIOS editor for AMD RX4XX and RX5XX cards
- Polaris BIOS Editor 1.6.7 (Elpida, micron, samsung, hynix)
- AMD Blockchain Driver — driver overview, installation, download
- AwesomeMiner: Download and configured for Windows [Step-by-step setup]
- GMiner 2.14 (GPU miner Equihash/CuckooCycle/Ethash/ProgPoW/KAWPOW)


Read more:
 ATIFlash & AMD VBFlash v2.93: Download Software for flashing BIOS GPU
  WatchDog Prime (Download watchdog timer Esonics Software)
  BTCTools v1.3.3 – Download Antminer Software for managing, searching, flashing ASIC
  SRBPolaris V3.5: Download BIOS editing software for AMD RX4XX/RX5XX ATI Flash & AMD WinFlash v2.8.7: Download BIOS Flashing Tool for AMD GPUs
  NVCleanstall v1.6.0: Download Nvidia driver removal software
  RED BIOS EDITOR (RBE): Download software for flashing and overclocking AMD/ATI GPUs
  NiceHash Miner Legacy 1.8.1.6 [Download for Windows/Linux]
  ATIFlash & ATI WinFlash v2.8.4: Download BIOS Editor Tool for AMD GPUs
  AwesomeMiner v8.4.4: Download CPU/GPU/ASIC Mining Software for Windows
  OverdriveNTool v0.2.9: Download AMD GPUs timing tool for Windows


Post Comment